OVHcloud Bare Metal Installation
Plakar Control Plane can be deployed on an OVHcloud dedicated server using the
official QCOW2 image. The image can be downloaded from the
Downloads Page. Dedicated servers are available in the OVHcloud
Control Panel under Bare Metal Cloud -> Dedicated Servers.
Ordering a Dedicated Server
Choose a server according to Appliance Sizing, which gives the CPU, memory and disks for each size of deployment. The server needs two disks: one for the appliance system, and one for the Plakar Control Plane data.
Note
Dedicated servers on OVHcloud are preconfigured hardware offers, so you cannot always select an exact combination of CPU, RAM, and disk sizes. Choose the closest available offer to the recommended specifications above.
Installing the Appliance
The Plakar Control Plane appliance is distributed as a QCOW2 image. OVHcloud
allows custom images to be installed through its custom OS flow. After ordering
a dedicated server, the following setup is required.
OS Setup
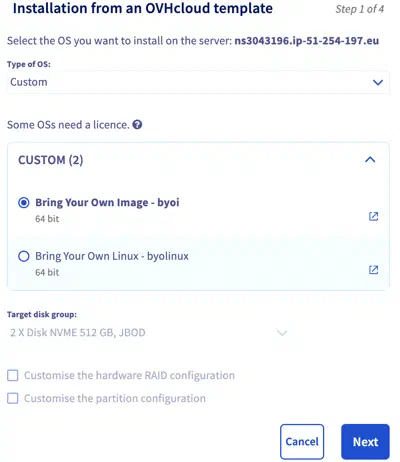
Set Type of OS to Custom, then select Bring your own image.
Appliance Image
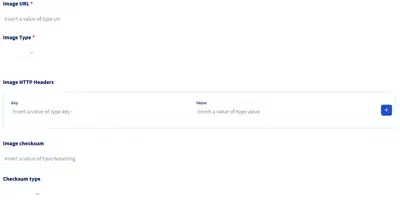
Provide a publicly accessible URL for the Plakar Control Plane QCOW2 image in
Image URL. You can use the download link from the
Downloads Page, or host the image yourself on publicly accessible
storage such as an S3 bucket. Set the Image Type to qcow2.
You can optionally provide a checksum to verify the image during installation.
The Downloads Page publishes a SHA-256 checksum for each image. If you provide
a checksum, enter it in Image checksum and set the checksum type to
SHA-256.
SSH Public Key
Leave SSH Public Key blank. OVHcloud’s SSH key configuration is not read by
the appliance. If you need SSH access, provide your public key through Config
Drive UserData. The appliance uses the plakar user for SSH access.
Config Drive UserData
Config Drive UserData contains the cloud-init configuration used by the appliance, such as SSH access, a proxy, registry mirrors or a static IP address. See Configuring the Appliance for more information.
EFI Bootloader
The appliance boots through UEFI. Set Path of the EFI bootloader from the OS
installed on the server to:
\EFI\BOOT\BOOTX64.EFI
Configuring the Appliance
The appliance reads its settings from the cloud-init document passed in Config
Drive UserData during installation. The keys of that document are described in
Appliance Configuration. Every key works on
OVHcloud bare metal, including network for a static IP address, several
interfaces or custom routes. Without it, the appliance uses DHCP.
If the appliance goes through a proxy or firewall, the hosts it has to reach are listed in required outbound access.
Writing the UserData
Paste the cloud-init document into Config Drive UserData. The document below sets every key. Remove the ones your environment does not need, each key is optional.
#cloud-config
ssh_authorized_keys:
  - ssh-ed25519 AAAA...

proxy:
  http: http://proxy.corp.example:3128
  https: http://proxy.corp.example:3128
  no_proxy: .corp.example

registry:
  mirrors:
    docker.io: harbor.corp.example/dockerhub-proxy
    ghcr.io: harbor.corp.example/ghcr-proxy
  insecure: false

releases:
  url: https://dist.corp.example/plakar/enterprise
  version: v1.1.2

ntp:
  servers:
    - 10.20.0.1
    - ntp.corp.example

network:
  ethernets:
    eth0:
      addresses: [10.0.1.5/24]
      gateway4: 10.0.1.1
      nameservers:
        addresses: [10.0.1.53]
Connect over SSH
If you configured an SSH public key, connect to the appliance using the plakar
user:
ssh plakar@<server-ip-address>Replace <server-ip-address> with the public IP address assigned to the
dedicated server.
Accessing Plakar Control Plane
Once the installation settings are configured, confirm the order to start the installation.
Note
The first boot may take some time while the appliance completes its initial setup.
Once the appliance has finished its first boot, Plakar Control Plane is reached
from a browser at http://<server-ip-address>, the public IP address of the
dedicated server. For first-time installations, you will be guided through the
enrollment process to:
- Register the instance with Plakar services for licensing and billing
- Create the initial administrator account
See the enrollment documentation for more details.