AWS Installation
Plakar Control Plane is distributed as an Amazon Machine Image (AMI) through the AWS Marketplace. You can access the marketplace listing here: Plakar Control Plane
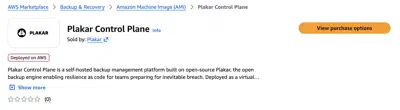
You can subscribe to the AMI by clicking View purchase options and completing the subscription process on the next page. After subscribing, click Launch your software to open the EC2 launch configuration page.
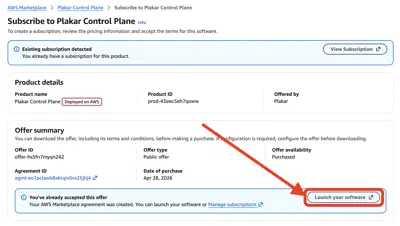
You can also launch the AMI later from the AWS Marketplace subscriptions management page in the AWS Console.

Launching the instance
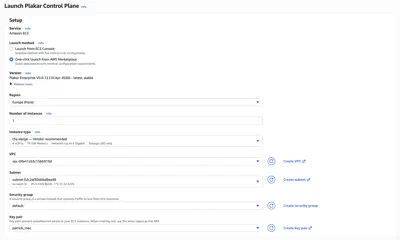
From the launch page, under Launch method, select One-click launch from AWS Marketplace, then choose the AWS region for your deployment.
Size the instance according to Appliance Sizing, which gives the CPU, memory and disks for each size of deployment.
The default marketplace configuration already selects a compatible instance type and storage configuration.
You will also need to configure:
- VPC
- Subnet
- Security Group
- SSH Key Pair
You can read more about security groups in the Security Groups section.
Once configured, click Launch to create the EC2 instance. After the instance has been launched successfully, you can view and manage it from the EC2 Instances page in the AWS Console.
Configuring the Appliance
An instance with direct internet access needs no configuration, and SSH access comes from the key pair selected at launch, as described in Connect over SSH. For anything else, such as a proxy or registry mirrors, the appliance reads its settings from the EC2 User data field, set before the instance is launched. The keys of the document are described in Appliance Configuration.
To provide User data, choose Launch from EC2 Console instead of One-click launch from AWS Marketplace. This exposes the Advanced details section, where you can paste the document or upload it as a file.
If the appliance goes through a proxy or firewall, the hosts it has to reach are listed in required outbound access.
The document below sets every key. Remove the keys your environment does not need, each key is optional.
#cloud-config
ssh_authorized_keys:
  - ssh-ed25519 AAAA...

proxy:
  http: http://proxy.corp.example:3128
  https: http://proxy.corp.example:3128
  no_proxy: .corp.example

registry:
  mirrors:
    docker.io: harbor.corp.example/dockerhub-proxy
    ghcr.io: harbor.corp.example/ghcr-proxy
  insecure: false

releases:
  url: https://dist.corp.example/plakar/enterprise
  version: v1.1.2

ntp:
  servers:
    - 10.20.0.1
    - ntp.corp.example

network:
  ethernets:
    eth0:
      addresses: [10.0.1.5/24]
      gateway4: 10.0.1.1
      nameservers:
        addresses: [10.0.1.53]
Security Groups
The networking configuration shown below is intended for a basic deployment setup.
In production environments, networking and access control should be adapted to match your infrastructure and security requirements. For example:
- Exposing Plakar Control Plane through a load balancer with HTTPS/TLS certificates
- Restricting access through a VPN or private network
- Limiting inbound traffic to trusted IP ranges
- Using internal-only networking
By default, the instance will not be accessible from a web browser because the default security group does not allow inbound HTTP traffic. To allow access to the Plakar Control Plane web interface:

- Select the Plakar Control Plane instance
- Open
Actions -> Security -> Change security groups - Attach a security group that allows inbound TCP traffic on port
80
The source can be:
- Your public IP address
- Your organization gateway or VPN address
For testing purposes, you can temporarily use 0.0.0.0/0
Warning
Using 0.0.0.0/0 allows access from any IP address and should only be used
for testing or temporary deployments.
Connect over SSH
The appliance accepts SSH connections as the plakar user, authenticated with
the key pair selected at launch:
ssh plakar@<public-ipv4-address>Replace <public-ipv4-address> with the public IPv4 address assigned to the EC2
instance. The security group attached to the instance has to allow inbound TCP
traffic on port 22 from wherever you connect.
Assigning an IAM Role
Plakar Control Plane requires AWS permissions to discover and classify resources in your AWS account so they can be used in backup workflows.
This is covered in detail in the AWS Inventory documentation.
Accessing Plakar Control Plane
Once the instance has started, Plakar Control Plane is reached from a browser at
http://<public-ipv4-address>, the public IPv4 address of the EC2 instance,
provided its security group allows inbound traffic on port 80. For first-time
installations, you will be guided through the enrollment process to:
- Register the instance with Plakar services for licensing and billing
- Create the initial administrator account
See the enrollment documentation for more details.